Getting Started
A simple use case for Chainlink CCIP is sending data between smart contracts on different blockchains. This guide shows you how to deploy a CCIP sender contract and a CCIP receiver contract to two different blockchains and send data from the sender contract to the receiver contract. You pay the CCIP fees using LINK.
Fees can also be paid in alternative assets, which currently include the native gas tokens of the source blockchain and their ERC20 wrapped version. For example, you can pay ETH or WETH when you send transactions to the CCIP router on Ethereum and MATIC or WMATIC when you send transactions to the CCIP router on Polygon.
Before you begin
- If you are new to smart contract development, learn how to Deploy Your First Smart Contract so you are familiar with the tools that are necessary for this guide:
- Acquire testnet funds. This guide requires a testnet ETH and LINK on Ethereum Sepolia. It also requires testnet MATIC on Polygon Mumbai. If you need to use different networks, you can find more faucets on the LINK Token Contracts page.
- Go to faucets.chain.link and get testnet ETH and LINK on Ethereum Sepolia.
- Go to faucet.polygon.technology to acquire testnet MATIC.
- Learn how to Fund your contract with LINK.
Deploy the sender contract
Deploy the Sender.sol contract on Ethereum Sepolia. To see a detailed explanation of this contract, read the Code Explanation section.
-
Open the Sender.sol contract in Remix.
-
Compile the contract.
-
Deploy the sender contract on Ethereum Sepolia:
-
Open MetaMask and select the Ethereum Sepolia network.
-
In Remix under the the Deploy & Run Transactions tab, select Injected Provider - MetaMask in the Environment list. Remix will use the MetaMask wallet to communicate with Ethereum Sepolia.
-
Under the Deploy section, fill in the router address and the LINK token contract addresses for your specific blockchain. You can find both of these addresses on the Supported Networks page. The LINK token contract address is also listed on the LINK Token Contracts page. For Ethereum Sepolia, the router address is
0xD0daae2231E9CB96b94C8512223533293C3693Bfand the LINK address is0x779877A7B0D9E8603169DdbD7836e478b4624789.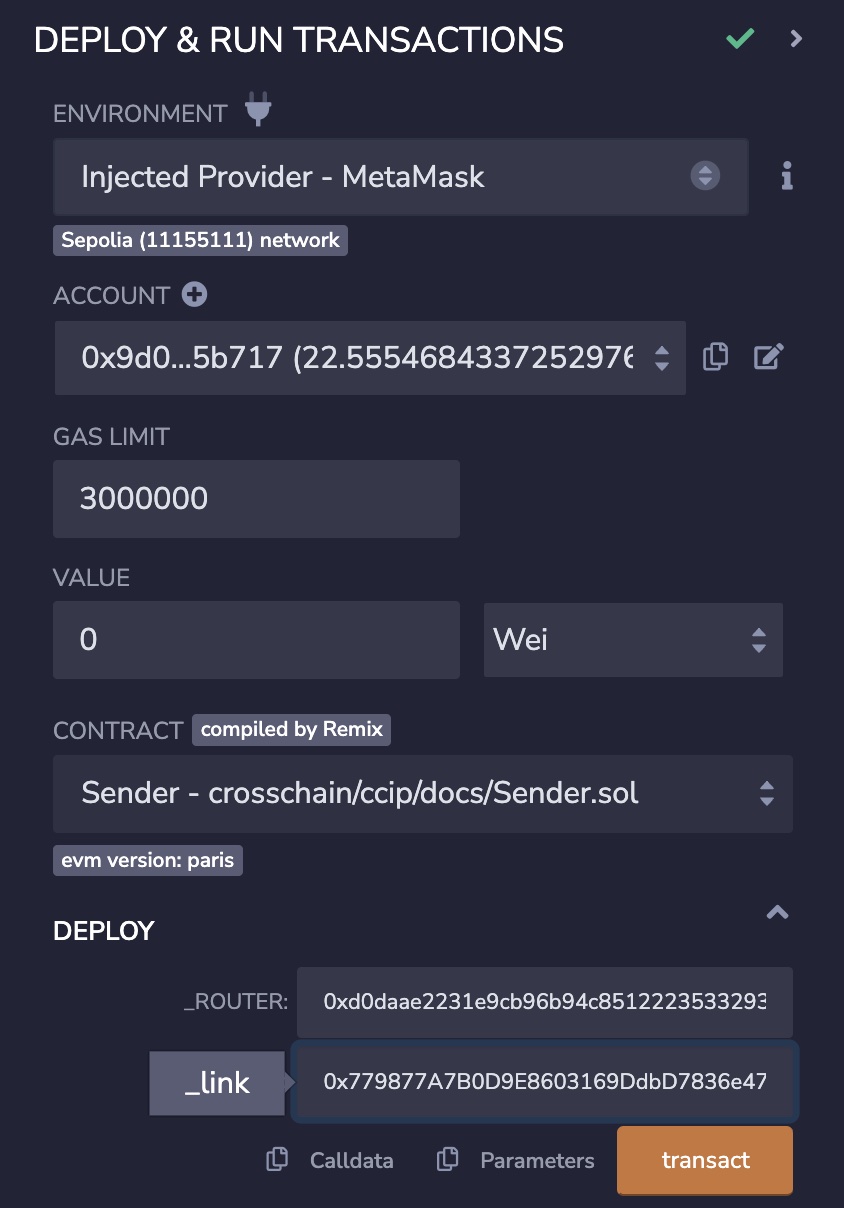
-
Click the Deploy button to deploy the contract. MetaMask prompts you to confirm the transaction. Check the transaction details to make sure you are deploying the contract to Ethereum Sepolia.
-
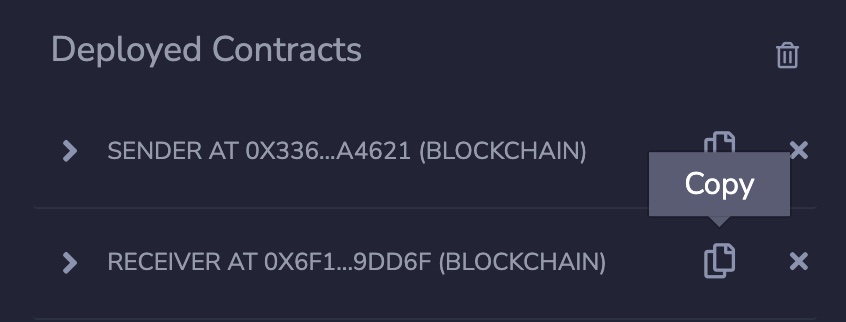
After you confirm the transaction, the contract address appears in the Deployed Contracts list. Copy your contract address.

-
Open MetaMask and send
0.01LINK to the contract address that you copied. Your contract will pay CCIP fees in LINK.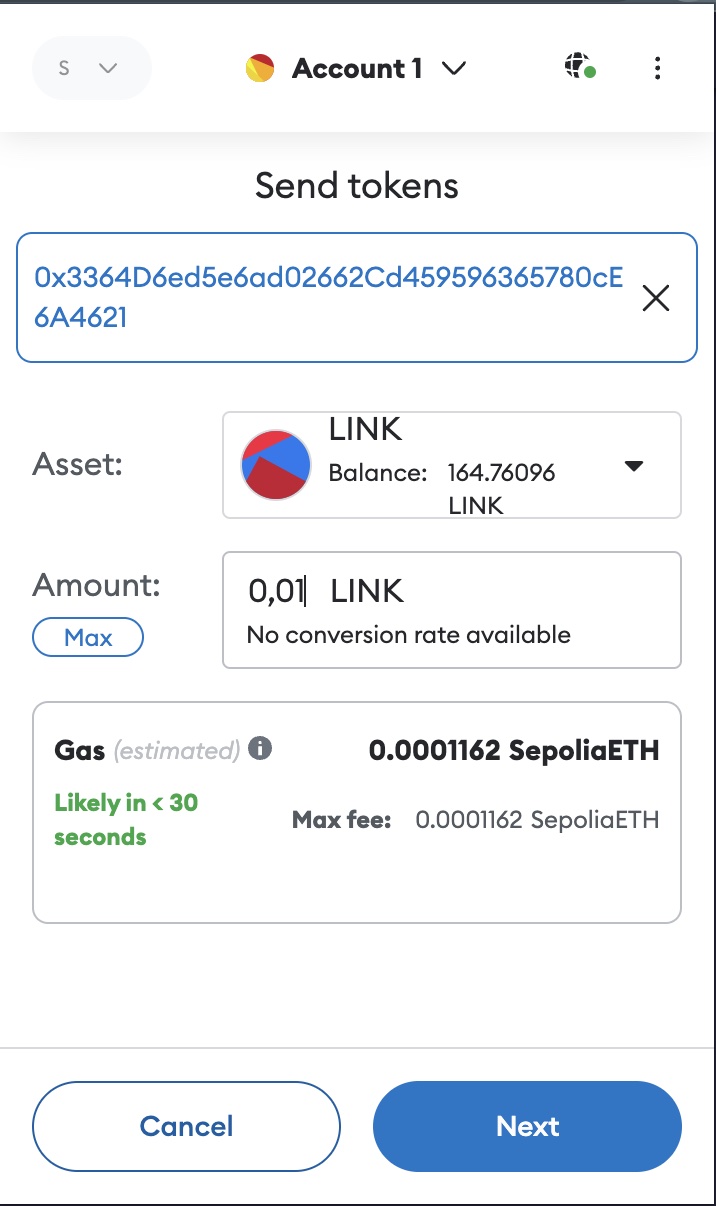
-
Deploy the receiver contract
Deploy the receiver contract on Polygon Mumbai. You will use this contract to receive data from the sender that you deployed on Ethereum Sepolia. To see a detailed explanation of this contract, read the Code Explanation section.
-
Open the Receiver.sol contract in Remix.
-
Compile the contract.
-
Deploy the receiver contract on Polygon Mumbai:
-
Open MetaMask and select the Polygon Mumbai network.
-
In Remix under the the Deploy & Run Transactions tab, make sure the Environment is still set to Injected Provider - MetaMask.
-
Under the Deploy section, fill in the router address field. For Polygon Mumbai, the Router address is
0x70499c328e1E2a3c41108bd3730F6670a44595D1. You can find the addresses for each network on the Supported Networks page.
-
Click the Deploy button to deploy the contract. MetaMask prompts you to confirm the transaction. Check the transaction details to make sure you are deploying the contract to Polygon Mumbai.
-
After you confirm the transaction, the contract address appears as the second item in the Deployed Contracts list. Copy this contract address.
-
You now have one sender contract on Ethereum Sepolia and one receiver contract on Polygon Mumbai. You sent 0.01 LINK to the sender contract to pay the CCIP fees. Next, send data from the sender contract to the receiver contract.
Send data
Send a Hello World! string from your contract on Ethereum Sepolia to the contract you deployed on Polygon Mumbai:
-
Open MetaMask and select the Ethereum Sepolia network.
-
In Remix under the the Deploy & Run Transactions tab, expand the first contract in the Deployed Contracts section.
-
Expand the sendMessage function and fill in the following arguments:
Argument Description Value (Polygon Mumbai) destinationChainSelector CCIP Chain identifier of the target blockchain. You can find each network's chain selector on the supported networks page 12532609583862916517receiver The destination smart contract address Your deployed contract address text Any stringHello World!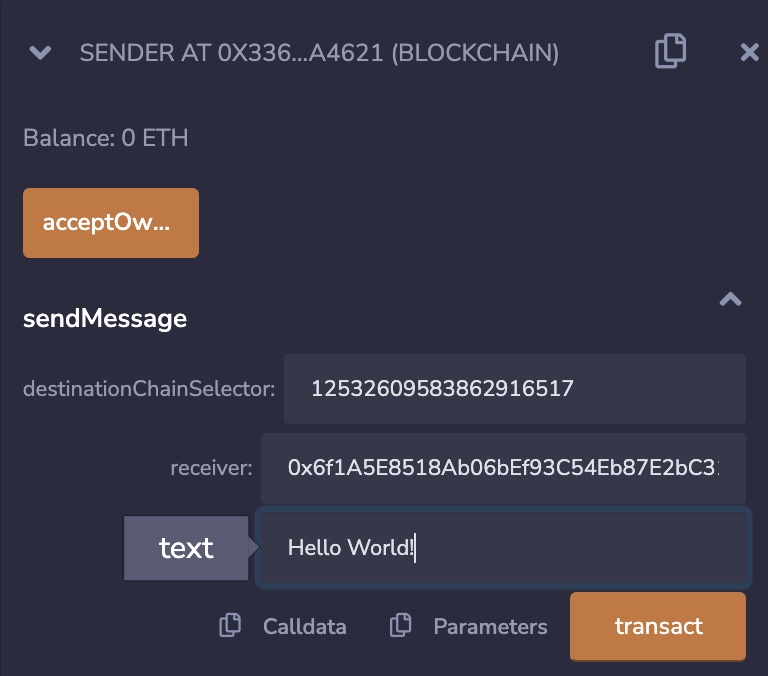
-
Click the transact button to run the function. MetaMask prompts you to confirm the transaction. Note: During gas price spikes, your transaction might fail, requiring more than 0.01 LINK to proceed. If your transaction fails, fund your contract with more LINK tokens and try again.
-
After the transaction is successful, note the transaction hash. Here is an example of a successful transaction on Ethereum Sepolia.
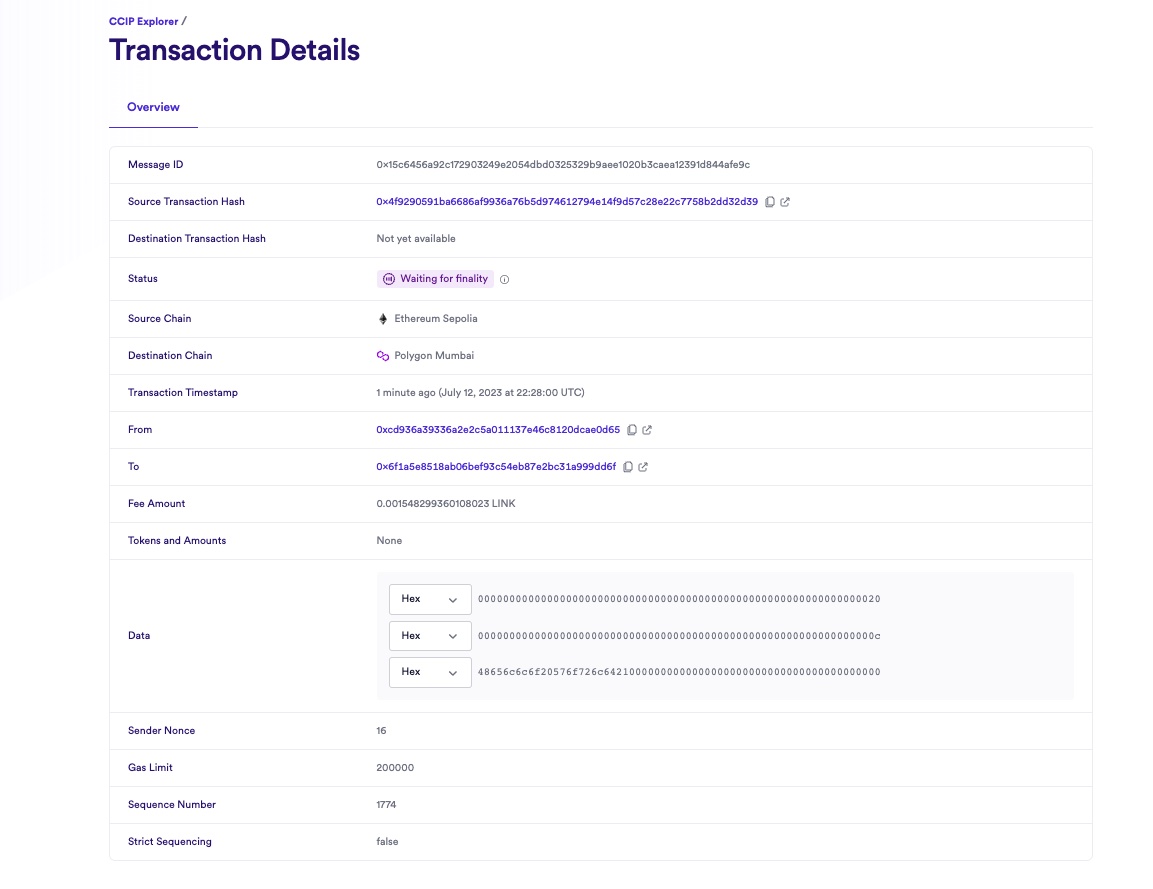
After the transaction is finalized on the source chain, it will take a few minutes for CCIP to deliver the data to Polygon Mumbai and call the ccipReceive function on your receiver contract. You can use the CCIP explorer to see the status of your CCIP transaction and then read data stored by your receiver contract.
-
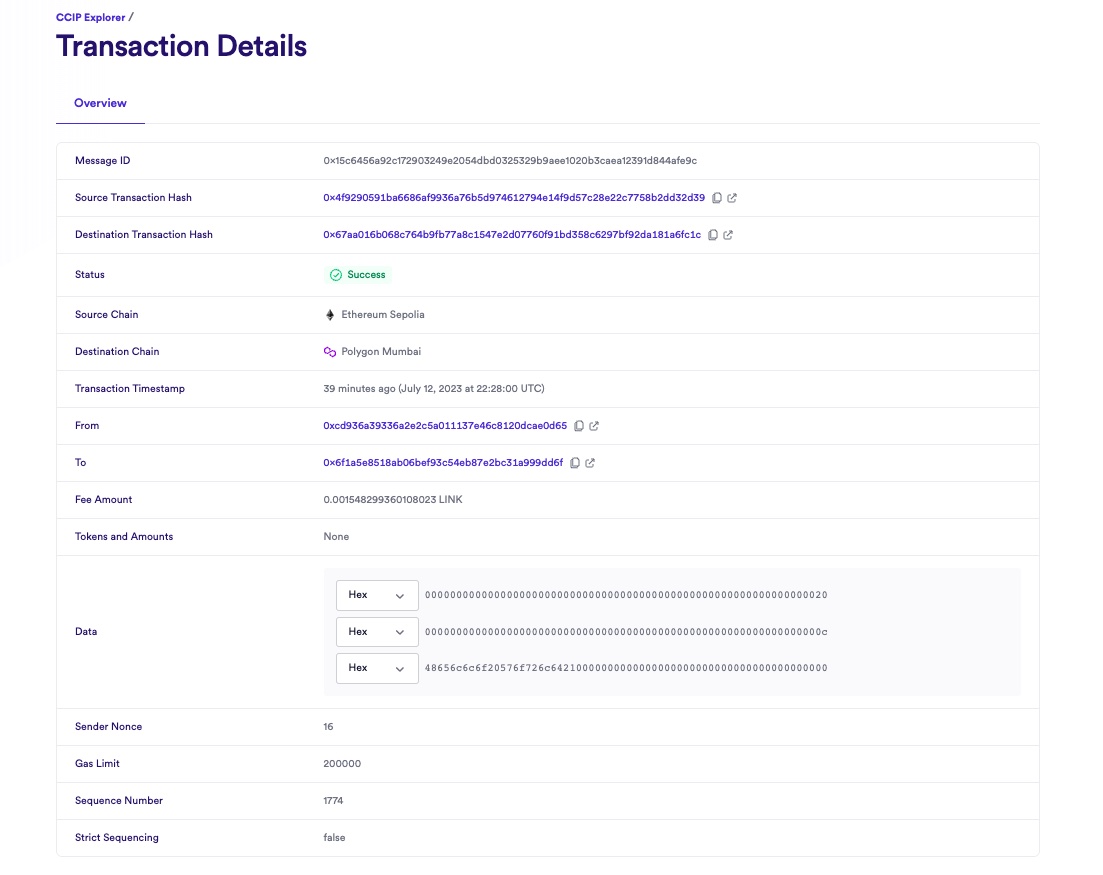
Open the CCIP explorer and use the transaction hash that you copied to search for your cross-chain transaction. The explorer provides several details about your request.
-
When the status of the transaction is marked with a "Success" status, the CCIP transaction and the destination transaction are complete.
Read data
Read data stored by the receiver contract on Polygon Mumbai:
-
Open MetaMask and select the Polygon Mumbai network.
-
In Remix under the the Deploy & Run Transactions tab, open the list of contracts of your smart contract deployed on Polygon Mumbai.
-
Click the getLastReceivedMessageDetails function button to read the stored data. In this example, it is "Hello World!".

Congratulations! You just sent your first cross-chain data using CCIP. Next, examine the example code to learn how this contract works.
Examine the example code
Sender code
The smart contract in this tutorial is designed to interact with CCIP to send data. The contract code includes comments to clarify the various functions, events, and underlying logic. However, this section explains the key elements. You can see the full contract code below.
// SPDX-License-Identifier: MIT
pragma solidity 0.8.19;

import {IRouterClient} from "@chainlink/contracts-ccip/src/v0.8/ccip/interfaces/IRouterClient.sol";
import {OwnerIsCreator} from "@chainlink/contracts-ccip/src/v0.8/shared/access/OwnerIsCreator.sol";
import {Client} from "@chainlink/contracts-ccip/src/v0.8/ccip/libraries/Client.sol";
import {LinkTokenInterface} from "@chainlink/contracts/src/v0.8/interfaces/LinkTokenInterface.sol";

/**
 * THIS IS AN EXAMPLE CONTRACT THAT USES HARDCODED VALUES FOR CLARITY.
 * THIS IS AN EXAMPLE CONTRACT THAT USES UN-AUDITED CODE.
 * DO NOT USE THIS CODE IN PRODUCTION.
 */

/// @title - A simple contract for sending string data across chains.
contract Sender is OwnerIsCreator {
    // Custom errors to provide more descriptive revert messages.
    error NotEnoughBalance(uint256 currentBalance, uint256 calculatedFees); // Used to make sure contract has enough balance.

    // Event emitted when a message is sent to another chain.
    event MessageSent(
        bytes32 indexed messageId, // The unique ID of the CCIP message.
        uint64 indexed destinationChainSelector, // The chain selector of the destination chain.
        address receiver, // The address of the receiver on the destination chain.
        string text, // The text being sent.
        address feeToken, // the token address used to pay CCIP fees.
        uint256 fees // The fees paid for sending the CCIP message.
    );

    IRouterClient router;

    LinkTokenInterface linkToken;

    /// @notice Constructor initializes the contract with the router address.
    /// @param _router The address of the router contract.
    /// @param _link The address of the link contract.
    constructor(address _router, address _link) {
        router = IRouterClient(_router);
        linkToken = LinkTokenInterface(_link);
    }

    /// @notice Sends data to receiver on the destination chain.
    /// @dev Assumes your contract has sufficient LINK.
    /// @param destinationChainSelector The identifier (aka selector) for the destination blockchain.
    /// @param receiver The address of the recipient on the destination blockchain.
    /// @param text The string text to be sent.
    /// @return messageId The ID of the message that was sent.
    function sendMessage(
        uint64 destinationChainSelector,
        address receiver,
        string calldata text
    ) external onlyOwner returns (bytes32 messageId) {
        // Create an EVM2AnyMessage struct in memory with necessary information for sending a cross-chain message
        Client.EVM2AnyMessage memory evm2AnyMessage = Client.EVM2AnyMessage({
            receiver: abi.encode(receiver), // ABI-encoded receiver address
            data: abi.encode(text), // ABI-encoded string
            tokenAmounts: new Client.EVMTokenAmount[](0), // Empty array indicating no tokens are being sent
            extraArgs: Client._argsToBytes(
                // Additional arguments, setting gas limit and non-strict sequencing mode
                Client.EVMExtraArgsV1({gasLimit: 200_000, strict: false})
            ),
            // Set the feeToken  address, indicating LINK will be used for fees
            feeToken: address(linkToken)
        });

        // Get the fee required to send the message
        uint256 fees = router.getFee(destinationChainSelector, evm2AnyMessage);

        if (fees > linkToken.balanceOf(address(this)))
            revert NotEnoughBalance(linkToken.balanceOf(address(this)), fees);

        // approve the Router to transfer LINK tokens on contract's behalf. It will spend the fees in LINK
        linkToken.approve(address(router), fees);

        // Send the message through the router and store the returned message ID
        messageId = router.ccipSend(destinationChainSelector, evm2AnyMessage);

        // Emit an event with message details
        emit MessageSent(
            messageId,
            destinationChainSelector,
            receiver,
            text,
            address(linkToken),
            fees
        );

        // Return the message ID
        return messageId;
    }
}
Initializing the contract
When deploying the contract, you define the router address and the LINK contract address of the blockchain where you choose to deploy the contract.
The router address provides functions that are required for this example:
Sending data
The sendMessage function completes several operations:
-
Construct a CCIP-compatible message using the
EVM2AnyMessagestruct:- The
receiveraddress is encoded in bytes format to accommodate non-EVM destination blockchains with distinct address formats. The encoding is achieved through abi.encode. - The
datais encoded from a string text to bytes using abi.encode. - The
tokenAmountsis an array. Each element comprises a struct that contains the token address and amount. In this example, the array is empty because no tokens are sent. - The
extraArgsspecify thegasLimitfor relaying the CCIP message to the recipient contract on the destination blockchain and astrictparameter. In this example, thegasLimitis set to200000andstrictis set tofalse. Note: Ifstrictis true andccipReceivereverts on the destination blockchain, subsequent CCIP messages from the same sender will be blocked by CCIP until the reverted CCIP message can be executed. - The
feeTokendesignates the token address used for CCIP fees. Here,address(linkToken)signifies payment in LINK.
- The
-
Compute the CCIP message fees by invoking the router's
getFeefunction. -
Ensure that your contract balance in LINK is enough to cover the fees.
-
Grant the router contract permission to deduct the fees from the contract's LINK balance.
-
Dispatch the CCIP message to the destination chain by executing the router's
ccipSendfunction.
Receiver code
The smart contract in this tutorial is designed to interact with CCIP to receive data. The contract code includes comments to clarify the various functions, events, and underlying logic. However, this section explains the key elements. You can see the full contract code below.
// SPDX-License-Identifier: MIT
pragma solidity 0.8.19;

import {Client} from "@chainlink/contracts-ccip/src/v0.8/ccip/libraries/Client.sol";
import {CCIPReceiver} from "@chainlink/contracts-ccip/src/v0.8/ccip/applications/CCIPReceiver.sol";

/**
 * THIS IS AN EXAMPLE CONTRACT THAT USES HARDCODED VALUES FOR CLARITY.
 * THIS IS AN EXAMPLE CONTRACT THAT USES UN-AUDITED CODE.
 * DO NOT USE THIS CODE IN PRODUCTION.
 */

/// @title - A simple contract for receiving string data across chains.
contract Receiver is CCIPReceiver {
    // Event emitted when a message is received from another chain.
    event MessageReceived(
        bytes32 indexed messageId, // The unique ID of the message.
        uint64 indexed sourceChainSelector, // The chain selector of the source chain.
        address sender, // The address of the sender from the source chain.
        string text // The text that was received.
    );

    bytes32 private lastReceivedMessageId; // Store the last received messageId.
    string private lastReceivedText; // Store the last received text.

    /// @notice Constructor initializes the contract with the router address.
    /// @param router The address of the router contract.
    constructor(address router) CCIPReceiver(router) {}

    /// handle a received message
    function _ccipReceive(
        Client.Any2EVMMessage memory any2EvmMessage
    ) internal override {
        lastReceivedMessageId = any2EvmMessage.messageId; // fetch the messageId
        lastReceivedText = abi.decode(any2EvmMessage.data, (string)); // abi-decoding of the sent text

        emit MessageReceived(
            any2EvmMessage.messageId,
            any2EvmMessage.sourceChainSelector, // fetch the source chain identifier (aka selector)
            abi.decode(any2EvmMessage.sender, (address)), // abi-decoding of the sender address,
            abi.decode(any2EvmMessage.data, (string))
        );
    }

    /// @notice Fetches the details of the last received message.
    /// @return messageId The ID of the last received message.
    /// @return text The last received text.
    function getLastReceivedMessageDetails()
        external
        view
        returns (bytes32 messageId, string memory text)
    {
        return (lastReceivedMessageId, lastReceivedText);
    }
}
Initializing the contract
When you deploy the contract, you define the router address. The receiver contract inherits from the CCIPReceiver.sol contract, which uses the router address.
Receiving data
On the destination blockchain:
-
The CCIP Router invokes the
ccipReceivefunction. Note: This function is protected by theonlyRoutermodifier, which ensures that only the router can call the receiver contract. -
The
ccipReceivefunction calls an internal function_ccipReceivefunction. The receiver contract implements this function. -
This
_ccipReceivefunction expects anAny2EVMMessagestruct that contains the following values:- The CCIP
messageId. - The
sourceChainSelector. - The
senderaddress in bytes format. The sender is a contract deployed on an EVM-compatible blockchain, so the address is decoded from bytes to an Ethereum address using the ABI specification. - The
datais also in bytes format. Astringis expected, so the data is decoded from bytes to a string using the ABI specification.
- The CCIP